
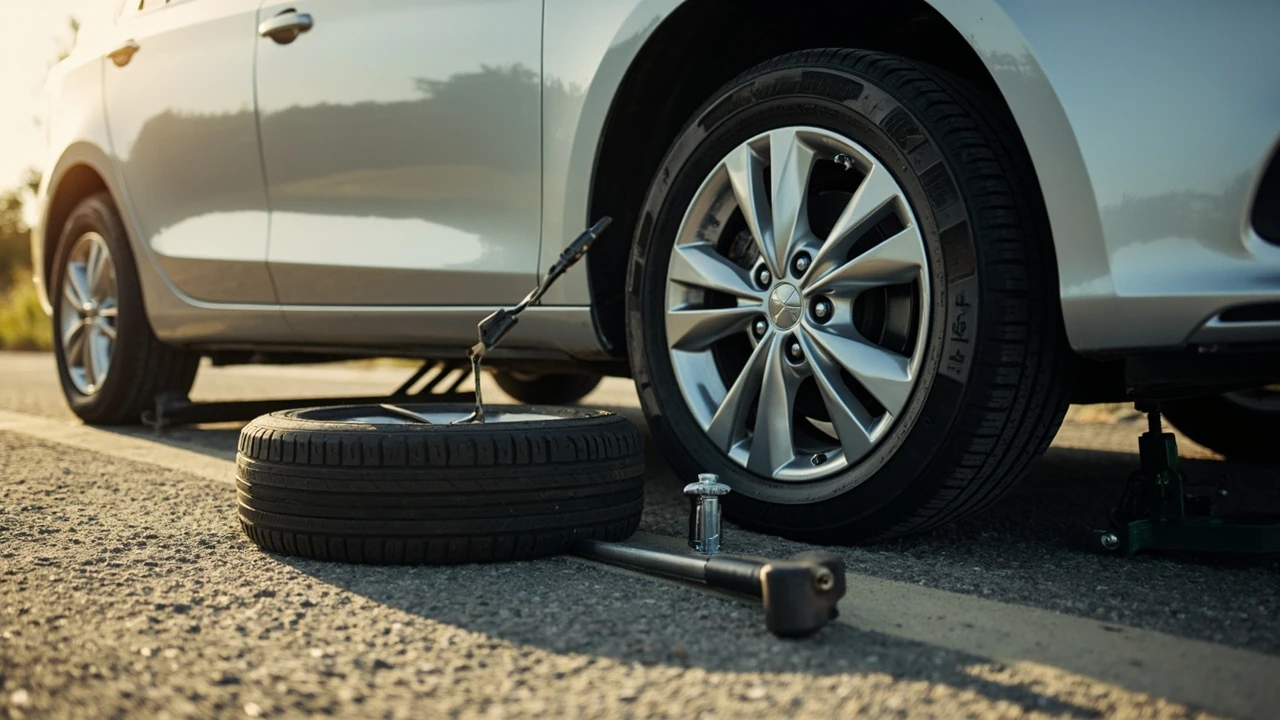
How to change a tire safely on the roadside
A tire that is visibly low, hissing, or showing a large puncture can leave you stranded if you wait until the car is already moving under its own weight. Knowing how to change a tire gives you control of the situation, but the goal is not to work faster than the job allows. The correct approach is to identify the problem, make the vehicle safe, support it on a properly rated jack, change the wheel, and get the damaged tire inspected before continuing normal driving.
This guide focuses on the common roadside task: replacing a passenger-vehicle wheel with a compact spare. Replacing the tire itself—removing it from the rim, repairing the rubber, and mounting it back—is a different job. Passenger tires, especially run-flat tires, are often designed to be dismounted and mounted with specialized equipment rather than by hand. A professional shop has equipment designed for that process, including shop tire-mounting equipment that handles the wheel after it has been removed from the vehicle.
Before touching the wheel, make sure you have the correct spare, the right tools, enough space, and a safe place to work. If the vehicle is in traffic, a steep slope, an unstable shoulder, or a location where passing traffic could strike you, roadside assistance or a tow service is safer than attempting the job in an exposed spot.
Decide whether the vehicle can be changed where it stopped
Begin with a slow inspection. Walk around the vehicle and identify the affected tire without crossing traffic. Look for obvious punctures, a tire that has separated from the rim, a sidewall bulge, a visibly damaged wheel, or a wheel sitting unevenly. A nail or screw in the tread may still be embedded, but a cut in the sidewall or shoulder is a different condition. A tire with major sidewall damage may not be safe to reinstall even if it still holds air.
Check the other three tires as well. If they also look dangerously low, the cause may be a leak rather than a single puncture. The vehicle’s warning lights, fuel level, battery condition, and ability to start also matter. If the engine will not run, the battery cannot support the vehicle’s electrical systems, or the flat tire is on a rear wheel and the spare is a temporary one with a speed restriction, plan for a tow rather than improvising.
| Situation | Safer response |
|---|---|
| The vehicle is parked in an active traffic lane | Call roadside assistance or arrange a tow to a safe location. |
| The ground is deeply sloped, soft, or uneven | Move the vehicle only if it can be driven safely; otherwise request a tow. |
| The wheel cannot be removed after correct loosening | Do not force it or use an improvised tool; obtain professional assistance. |
| The tire has a large sidewall cut, bulge, or separated bead | Do not reinstall it. Fit the spare if conditions are safe, then have the tire replaced. |
| The compact spare is missing or cannot hold air | Do not drive on the damaged tire; arrange a tow. |
| The vehicle cannot start or maintain adequate power | Request roadside help rather than draining the battery repeatedly. |
Your vehicle’s owner’s manual and door-jamb placard are more useful than general assumptions. They identify the correct spare, tire pressures, jack points, lug-nut pattern, and any restrictions on using the compact spare. If the information conflicts with a generic online tutorial, follow the vehicle-specific instructions.
- Find a firm, level surface away from moving traffic when possible.
- Turn on the hazard warning lights and set the parking brake.
- Avoid working beside a traffic lane, behind an unsupported vehicle, or on a surface that allows the jack to sink.
- Do not place your body beneath the vehicle, even when the wheel has been removed.
- Stop and request help if a required tool, spare, or safe work area is unavailable.
A flat tire is not worth converting into a collision or an injury. A tow may cost more than changing a tire, but it is the correct choice when the work area or equipment is inadequate.
Gather the tools and confirm that the spare is usable
Most passenger vehicles use a wheel lug wrench, sometimes stored with the jack or under the cargo floor. Some vehicles instead include a wheel-lock key that must fit over the locking socket. A jack is normally supplied with a wheel wrench, but the pieces are not interchangeable unless their shapes fit. If you need to borrow tools, confirm that the wrench fits the vehicle’s fasteners and that the jack has adequate capacity for the vehicle.
The compact spare may be stored under the trunk floor, in the rear cargo area, or in another location. Remove it carefully and inspect it before relying on it. Confirm that the tire is inflated, the valve stem is present, and the spare is the correct size and type for the vehicle. A temporary spare is designed for limited use and may carry a maximum speed printed on its sidewall. If that label is unreadable, treat the spare as unusable until it is checked.
| Tool or item | What to check before use |
|---|---|
| Wheel lug wrench | Correct socket size, secure engagement, and no cracked handle or damaged fasteners. |
| Wheel-lock key | Correct key for the vehicle and accessible with the lug wrench. |
| Jack | Proper type, intact seals and mechanisms, and adequate vehicle rating. |
| Compact spare | Correct fit, adequate pressure, intact sidewall, readable speed restriction, and usable valve. |
| Chocks | Correct size for the wheels and a surface that will hold them. |
| Work gloves and flashlight | Protection for your hands and enough light to see lug sockets and the jack contact point. |
If you have not changed a tire before, practice the wheel-lock-key fit and identify the jack point before the vehicle is raised. Many crossover and pickup models place the jack point near the rear of the front wheel or ahead of the rear wheel, but the exact location varies. The reinforced sill area shown in the vehicle’s instructions is not automatically the correct jack point. Never guess from appearance alone.
Use the supplied spare information to check the tire size before driving away. If the spare is noticeably worn, mismatched, or labeled for another vehicle, it may not be safe. The driver’s door placard should identify the compact spare’s cold inflation pressure. This guidance also helps when you need to find the tire size without guessing.
Place the tools within reach but outside the path of the vehicle. A wrench left under a tire can prevent the vehicle from moving when you reinstall the wheel. Keep the wheel studs and the area around the hub free of dirt, because small particles trapped against the brake components can cause noise or damage.
Secure the vehicle and remove the damaged wheel
Park according to the owner’s manual, place the transmission in park for an automatic-transmission vehicle or in gear for a manual-transmission vehicle, and firmly apply the parking brake. Turn on the hazard lights. If the manual instructs you to do so, switch off the engine while working. Chock the wheel diagonally opposite the flat tire so the vehicle cannot roll toward the work area.
Do not loosen the lug nuts while the tire is still carrying the vehicle’s weight. If you loosen them with the wheel on the ground, the vehicle may slip off the jack or roll. First, use the lug wrench to break the fasteners loose by a quarter turn or so. Then position the jack at the specified point and raise the vehicle only until the tire clears the ground enough to remove the wheel.
Watch the vehicle as the jack rises. Stop immediately if the body shifts, the jack tilts, the load moves away from the jack point, or the vehicle begins to lean. Lower the vehicle and reposition it on firmer, level ground if possible. Some models have an underbody reinforcement or a nearby component that can be damaged by lifting in the wrong place. If you cannot clearly identify the correct contact point, stop rather than guessing.
- Set the parking brake and place the transmission in park or gear.
- Chock the diagonally opposite wheel securely.
- Use the lug wrench to loosen each lug nut about a quarter turn.
- Position the jack at the vehicle’s specified lifting point.
- Raise the vehicle slowly until the affected tire clears the ground.
- Remove the lug nuts and set them in a clean, organized place.
- Pull the wheel straight off the hub, taking care not to strike the brake parts.
Some wheels can be difficult to remove because the wheel and hub faces stick together. Do not hammer the wheel, pry against the brake components, or use an unapproved homemade tool. A small amount of penetrating product may help with corrosion, but follow the product directions and allow enough time. If the wheel remains stuck, a technician can handle it without risking the hub, studs, or brake assembly.
Once the wheel is off, examine the hub face, studs, brake rotor, and dust shield. Look for mud, rust, brake dust, or a loose object. Clean the mounting surfaces before installing the spare. Also check the tire behind the removed wheel: if it was run significantly underinflated, it may have damaged sidewall lettering, separated, or lost its shape. Do not assume that a tire which still holds air is reusable.
Install the spare and lower the vehicle safely
Mount the compact spare with the valve stem facing outward when the design allows it. Align the bolt or lug holes with the studs and push the wheel onto the hub. The wheel should sit flush against the mounting surface. If it does not, remove it and check for debris, a mismatched wheel, or an incorrect spare rather than tightening the fasteners with the wheel in the wrong position.
Install the lug nuts loosely at first. Tighten them in a crisscross sequence so the wheel seats evenly. For a five-lug wheel, for example, an order such as positions one through five, then return to the first position, helps draw the wheel into place evenly. Follow the vehicle’s specified tightening sequence when one is provided. Do not use the final tightening value shown on a tire sidewall as the wheel-lug torque; tire inflation pressure and wheel fasteners have different requirements.
Because the vehicle is still on the jack, the lug nuts cannot receive their full final tightening during initial installation. Tighten them snugly enough to keep the wheel seated, lower the vehicle until the tire contacts the ground, and then tighten the fasteners fully in the prescribed sequence. The owner’s manual may specify a tightening procedure in multiple stages. Follow those instructions rather than relying on a remembered number from another vehicle.
- Align the spare wheel with the hub and studs.
- Install all lug nuts and tighten them lightly in a crisscross sequence.
- Lower the vehicle slowly until the tire rests on the ground.
- Remove the jack completely and confirm it is clear of the vehicle.
- Tighten the lug nuts fully in the specified sequence.
- Recheck each fastener once the vehicle is fully supported.
Refit the wheel and any storage covers only after the wheel is securely installed. Store the damaged tire, jack, tools, and chocks so they cannot strike or interfere with the vehicle. If the tire repair service needs the tire for inspection, leave a note describing what happened and where the puncture is located, but do not drive with the tire loose in the passenger compartment.
Before moving, check the tire pressure against the door-jamb recommendation for the compact spare. A spare may need a higher pressure than a standard road tire. If no suitable gauge is available, drive cautiously to the nearest safe location where pressure can be checked, while following the spare’s speed limit. For additional context, Federal tire-safety guidance also recommends checking tires regularly and following the vehicle and tire manufacturer instructions.
Know when to drive slowly, stop, or call for help
A compact spare is a temporary solution. Its sidewall may state a maximum speed such as 55 mph, and that limit applies even when traffic is moving faster. Stay within the stated restriction, keep extra distance, avoid sudden steering or braking, and use a lower, smoother route when possible. If the vehicle feels unstable, the tire loses pressure quickly, or the spare is damaged, stop in a safe place and contact roadside assistance.
The spare’s job is to get the vehicle to a repair location, not to restore normal handling completely. A temporary spare often has a different diameter, tread pattern, and construction from the standard tire. It may also produce different steering response or clearance behavior. Avoid highway driving when a slower route is available, especially if the spare is intended only for short-distance use.
| What you notice after installation | What to do |
|---|---|
| The vehicle pulls to one side | Stop safely and verify that the spare is fully seated and the fasteners are tight. Do not continue if the pull is significant. |
| A fastener will not stay tight | Do not drive. Have the stud, wheel, or fastener inspected because the wheel may not be seated correctly. |
| The spare loses pressure quickly | Do not continue. Check for an obvious cause if safe, then request roadside assistance. |
| You hear rubbing, clicking, or grinding | Stop as soon as possible. The spare may not be the correct wheel or something may be contacting the brake assembly. |
| The warning for reduced tire pressure remains on | Continue only if the spare is correct, secure, and permitted, but arrange prompt service. |
| The vehicle shakes over bumps | Stop and inspect the spare, wheel seating, and fasteners. Continue only after the cause is resolved. |
Do not ignore vibration or steering problems just because the wheel was changed. A wheel that was installed incorrectly, a damaged hub, a bent wheel, or unrelated suspension damage can affect handling. If the symptom began with the tire change, have the installation checked before resuming normal travel.
At the repair shop, explain whether the tire was driven while flat, how far the vehicle traveled, and whether the vehicle pulled or shook. That information can help the technician assess hidden damage. If the tire was run flat, replacing it may be safer than repairing it, subject to the tire manufacturer’s assessment and the technician’s inspection.
Frequently asked questions
How long does it take to change a tire?
A roadside wheel change commonly takes about 20 to 40 minutes when the spare is accessible, the tools fit, and the wheel comes off normally. Corroded fasteners, a wheel that resists removal, incorrect equipment, or an unsafe location can add substantial time. If the job does not proceed normally, do not force it. Professional assistance is usually faster than damaging the hub, wheel, or brake components.
Can I change a tire by myself?
You can change a passenger-vehicle wheel if you have the correct spare and tools, the instructions are clear, and you can work in a safe location. The job requires physical ability, good visibility, and enough room to use the wrench without traffic or unstable ground creating a hazard. If you are unsure about the jack point, lug pattern, wheel removal, or torque procedure, ask a qualified tire professional or roadside service to handle it.
Do I have to replace all four tires?
Not necessarily, but the replacement should match the remaining tires closely in size, type, construction, and tread condition. Mixing a temporary spare with normal tires is acceptable only for short-term use and only within the spare’s stated limitations. If one tire has suffered major impact damage or the other tires are badly worn, a technician should assess the vehicle as a whole before suggesting a complete set.
Can I drive on a tire with a nail in it?
It depends on the tire, the puncture, and how far you need to travel, but it is not a good general practice. A nail in the tread area may sometimes permit a short, slow trip to a repair shop, while a cut in the shoulder or sidewall can make continued driving unsafe. A tire that has run underinflated may also be damaged even if the object in the tread is small. If you are uncertain, install the spare or request roadside help.
How tight should the lug nuts be after changing a tire?
Tighten them to the torque specified for your vehicle, not to a generic value shared by other cars. Follow the sequence and any staged-tightening instructions in the owner’s manual. If the manual does not provide a torque value, a qualified technician should tighten and verify the fasteners. The wheel-lug torque is separate from the inflation pressure printed on the tire sidewall.
How often should I check the spare tire pressure?
Check it regularly, especially before bad weather or long trips, and inspect it whenever you check the road tires. A spare can lose air slowly and still look normal. Verify the pressure against the compact-spare specification on the door placard. If the spare is low, inflate it to the specified pressure and confirm that it remains stable over time.
What if the wheel will not come off?
Make sure the lug nuts are fully loosened, the wheel-lock key is being used correctly, and the vehicle is securely supported. Do not strike the wheel with a hammer, lever against the brake components, or apply sudden sideways force to a wheel that may be stuck by corrosion. Such attempts can damage the wheel, hub, studs, or brakes. A technician has tools and controlled methods for freeing a seized wheel.
Is it safe to drive on a compact spare?
It can be safe for a limited trip when the spare is correctly installed, adequately inflated, undamaged, and used within the speed restriction printed on it. Temporary spares often provide limited tread, handling, and distance. Drive smoothly, avoid highways when possible, and do not ignore vibration, pulling, rubbing, or a fast pressure loss. If the compact spare is not specifically rated for the vehicle, do not use it.
What should I do after using a temporary spare?
Have the damaged tire replaced promptly and have the spare checked for pressure and condition. Tell the technician if the vehicle was driven while the tire was flat, because internal damage may not be visible from the outside. Restore the full-size spare and any tools after the repair, and follow the tire pressure and maintenance schedule for the restored spare. If the vehicle handles differently after the original wheel returns, do not ignore the symptom.

Leave a Reply